Arduino Servo Motor Controller

How To Control Servo Motor Using Joystick Full Program Code And Circuit Diagram Homemade Circuit Projects Circuit Projects Arduino Joystick

Arduino Servo Motor Control With Pushbutton Arduino Arduino Projects Customized Windows

Wireless Servo Motor Control Using Arduino Transmitter Arduino Wireless Arduino Arduino Radio

Arduino Android Bluetooth Multi Servo Motor Control Android App Arduino Arduino Projects Servo Arduino

Android Arduino Control Arduino Bluetooth Servo Motor Control Arduino Bluetooth Arduino Arduino Sensors

Arduino How To Control Servo Motor With Potentiometer In 2020 Arduino Arduino Projects Electronics Projects

You can also see the 3 wires that connect to the outside world.
Arduino servo motor controller.

Servo Motor Control With Arduino Due Arduino Arduino Projects Arduino Due Projects

Arduino Servo Motor Control Using Joystick Circuit Projects Arduino Arduino Projects

Servo Motor Control Via Bluetooth With Potentiometer Arduino Projects Arduino Bluetooth

Wireless Servo Motor Control Using 2 4 Ghz Communication Link Homemade Circuit Projects Circuit Projects Arduino Remote Control Electronics Basics

Servo Motor Control Using Arduino In 2020 Arduino Circuit Diagram Arduino Circuit

How Servo Motors Work How To Control Servos Using Arduino Howtomechatronics Arduino Arduino Projects Control

Servo Control By Push Button Arduino Arduino Motor Control Arduino Motor

Learn How To Control Servo Motor By Arduino Library Also Learn Servo Motor Connection And Programming Code Arduino Arduino Projects Interfacing

Wireless Servo Motor Control Using Arduino Receiver Circuit Projects Arduino Remote Control Electronics Basics

How To Control 3 Servo Motors Using Push Button Switches And An Arduino Uno Arduino Arduino Motor Control Servo Arduino

Learn How To Control A Servo Based On The Readings Of An Mpu6050 Accelerometer And Gyroscope Sensor Arduino Arduino Projects Simple Arduino Projects

Arduino And Pca9685 Circuit Schematic Motor Works Arduino Arduino Motor

Rc Servo Motor Control Signal Arduino Motor Works Arduino Sensors

Multiple Pca9685 Drivers Daisy Chained Circuit Arduino Motor Works Servo Arduino

Sweep Servo Motor With Arduino Nano Arduino Arduino Projects Microcontrollers

Turnout Control With Arduino Servos The N Scaler Arduino Arduino Projects Electronics Basics

Controlling Multiple Servo Motors With Arduino Arduino Robotics Engineering Motor

Servo Motor Using Arduino Pca9685 16 Chanel Module Arduino Arduino Board Arduino Projects
1
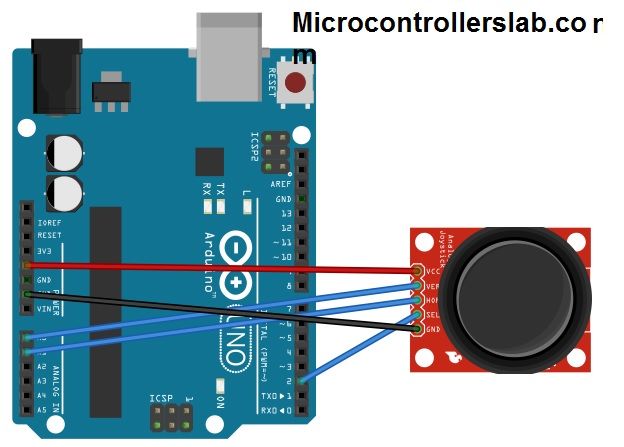
Joystick Based Servo Motor Control Using Arduino Arduino Arduino Projects Joystick

Android Control Arduino Bluetooth Servo Motor Control Arduino Bluetooth Arduino Radio Control Diy

Bluetooth Controlled Servo Motor Circuit Diagram Using Arduino Arduino Bluetooth Arduino Servo Arduino

Servo Motor Stepper Motor Connect To Arduino Cnc And Plc Arduino Cnc Arduino Stepper Motor

Arduino Keypad Controlled Servo Arduino Servo Arduino Arduino Projects
Source : pinterest.com
